Tuesday, May 25, 2010

Spray painting

With money being tight nowadays, perhaps the solution to giving your car a new look would be to indulge in some car spray painting. If the mechanics of it are in good shape, but the body is not so hot, then painting it may be the ideal solution.

It is a great money saver, but even more so if you do it yourself as opposed to having it professionally done. You can do it if you learn the basics and follow the instructions for car spray painting. It’s important though if you decide you are going to undertake this project that you are prepared to see it through till the end.

First of all, you need some supplies. These consist of:

- coverings to protect the unpainted areas and masking tape to hold these in place
- a good car wash detergent and brush as well as a wax/grease remover. The car must be
- various grits of sandpaper
- primers and paint that is urethane base for the car spray painting
- paint sprayer
- safety equipment such as masks, goggles and protective clothing
- knife and putty for fill ins.

One:
You must be sure that you wash the car thoroughly to remove all grime and debris. If you don’t then these things will be set in with your paint, giving a very discouraging look to the finished job. Follow up with a wax/grease remover so the paint you use for the car spray painting will adhere properly.

Two:
Remove any rough spots by sanding. Once this has been done be sure to rinse off any of the loose sandings. This is where you will want to use the putty to fill in any minor pit marks, that are have been caused from stones for example.

Three:
Don’t get in too much of a hurry to start your car spray painting. The car must be completely dry so it is best to leave it to do so for a few hours. You can go ahead and cover any of the areas that your do not want to get paint on.

Four:
Now you are ready to start with the primer. Don’t skip this step, as it will give a much improved look to the finished project. It helps the paint to adhere properly and allows for a more even finish. Next, once the primer is dry you will need to lightly sand it down.
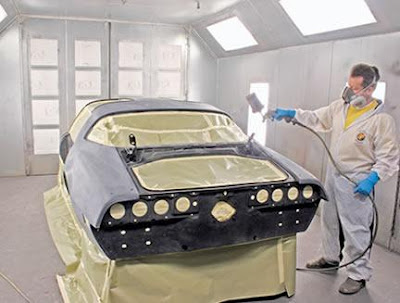
Five:
You are finally at the step you have been waiting for. Its time to apply the color for your car spray painting. Whether you have chosen to use aerosol paints or a spray gun, the premise remains the same. Only apply thin coats. Several will probably be needed. Many light coats are much better than one thick coat. You will be able to tell just by looking at the car how many more coats of paint it will need. Some may only need two whereas others may need three or four.

Painting ceiling

When it comes to painting a house there's nothing that makes people cringe more than the thoughts of painting a ceiling. You just know you're going to wind up covered in drops of paint - no matter how much you cover your arms, face and head. On top of that it's just a plain old awkward place to get at and you never know quite what the surface finish of the ceiling is like until you get started. So how are you going to get the results you want with your ceiling painting project?

The first place to start looking is at your tools and choosing the right paint for the job at hand.

Obviously the first big item on your shopping list is paint. You need to know your paint types. You can choose from the two main categories of oil and latex paint. Then you need to look at the type of finish you want to achieve. A gloss paint will help you reflect a lot of light around a room. Matt paint will give you a more subdued look which will suit some rooms more than others.

Outside of your day-to-day paints there are some special types of paints that you would only use on specific types of painting jobs. There are paints for covering textured ceilings and even specific paints for coating acoustic tiles.

If the ceiling you're about to paint is textured then you'll have to say goodbye to rollers. These simply won't work with a textured stucco-type ceiling. You'll have to look at spraying and this means plenty of ventilation and a certain level of skill - which if you don't possess you'll have to hire somebody in instead. Otherwise you're just going to make a huge mess which is the last thing you really want in your home right?

To prime your walls or not to prime your walls? Well the simple answer is more often than not you will need to. There's far more reasons for applying a coat of primer before you start painting. First off most surfaces need to be primed - especially if the walls are porous or damaged in any way - recent touch up jobs on cracks for example. You'll also save a small fortune by only having to apply one or two coats of actual paint - if the surface is primed you're just going to get a much better finish. Otherwise you'll be applying one coat of paint after another and you might still wind up with streaks or dark patches - especially if the original wall color was dark.

If you want to cut down on the mess you make while you're painting your ceilings then make sure you've mixed your paint properly. To test the consistency of your paint try it on a small patch of wall. If the paint isn't thick enough it will run down the wall. That's not what you want because that means lots of drips from the ceiling so you know you need to check the consistency.

One of the most useful items in your painting toolkit is an extension pole for your roller so that you're not damaging your neck and shoulders. It will allow you to effectively paint ceilings - especially the higher types of ceilings. While painting try to keep the pole at an angle - this will help stop you getting covered in splatters of paint and keep the major stresses off your back, neck and shoulders.

Painting tips

Our lives are getting very busy, and with that comes very little time to maintain housing projects such as painting. It is much more convenient to hire a painting contractor. By hiring a professional, you will get a higher quality paint job, as opposed to a do-it-yourself project. Your next step is to find the perfect painting contractor. It can be very tricky finding a professional whom you can trust to get the job done correctly.

The first place to start looking is within your circle of friends or your family. They can help give you ideas of who the best painting contractors are and who they have heard is the most reliable. Your co-workers might also have suggestions about professional painters. Keep in mind that each person has their own idea of quality, and you should examine the work done on their house so that you can determine if it is the quality that you want.

The customer satisfaction is very important when choosing a professional through references. While their quality of work is important, the way that they treat their customers is also important. The fact that you are hiring a person to do the job proves that you want the experience to be as stress free as possible. In return, you want to pick a professional who is pleasant to work with, as well as courteous to all of your questions or preferences. When inquiring with your friends or family about the professional painter that they used, you should also ask if the contractor arrived on time each morning.

If your friends, co-workers, or family have no recommendations then there are other options. Try inquiring with a person at your local paint store; this does not include a home improvement center. Many professional painters will purchase their supplies from a local paint store because of the valuable prices. The person at the paint store can let you know the type of paint that the professional usually chooses, and if it is of the highest quality.

The Better Business Bureau is another place that you can find a professional painter. Contractors who are reliable and responsible will join the Better Business Bureau. Search for painters who have had no judgments made against them or bad comments. You can call your local office or visit the website. The Better Business Bureau keeps all records on file for 3 years.

After you have a list of prospective painting contractors, your next step should be to call each one. Most importantly, ask about a paint warranty. Three years is usually acceptable for an expiration of a paint warranty. After you make arrangements with the painter, make sure that you get everything in writing. Try to narrow all of your choices down to three painters. Do not be afraid to ask a lot of questions. Make an appointment and examine how courteous they are with your questions and if they are very professional.

Once you have chosen a painter, ask for a written proposal of what will be done during the job and what products the painter will be using. This should include the amount charged for the surface preparation, the priming, what type of primer will be used, the caulking, and the brand of paint that is being used. A professional painter will also have a description of the paint manufacturer’s product line.

Decorative painting

Painting with acrylic paint is very versatile. The paints are either tube or jarred acrylic or craft paint. These paints can be found at craft stores and /or art stores. Acrylic paints dry quickly and are easy to use. Paint brushes generally use synthetic hairs and have an easy clean up with soap and water.

What brand of acrylic paint should used- Purchase either tube, jar or craft bottles from either an art store or craft store such as Michael’s.

What colors should be purchase – Most importantly purchase the following: Cadmium Red Medium, Cadmium Yellow Phthalo Blue. These three colors will make every color on the color wheel. Of course having the colors already made is simpler, but more expensive.

What brushes should be purchase – Good brushes are really important to have. If they are taken care of they will last for a reasonable amount time depending on how much you paint and the type painting. Brush sizes are as follows: flat brushes- # ¼”,1/2”,1”; flat # 1”, liner # 2, and an assortment of round, #1/4”, ½”, and 1” filbert and large wash brushes for backgrounds.

Painting Tips:

1. Place a small amount of paint (either tube or bottle) onto your palette. A regular plastic palette or a Sta-Wet pallete works very well with acrylic paints. Always have a spray bottle of water at hand to spray lightly over the paint to keep the paint moist on your palette. Mist regularly.

2. Fill your container with water. As the water becomes murky, pour out the dirty water and refill the water container with fresh water often. Keep folded, single layers of paper towels to blot your wet brush onto the paper towels. This will keep the brushes in good condition as the metal ferule will be kept dry.

3. Acrylic paint is very versatile. The paint can be used lightly or thicker with brushes and palette knives. Mix the acrylic paints with a touch of white to make them more opaque. If the paint is diluted with either glaze or water the colors will become transparent like watercolors.

4. When painting acrylic washes, the wash is permanent and insoluble as soon as it is dry. Subsequent layering of the washes (drying between layers) adds depth to the sheer washes.

5. Transparent acrylic glazes using a glazing medium must be layered between drying time. The more layers, the deeper the depth of color will develop.

6. Mix a Slo-Dri Blending gel medium with acrylic paint to increase the loss of color strength.

7. Work quickly when you are blending colors. It is important to keep your brush damp with a slow drying gel medium. For more transparency add a gel medium as needed.

8. When developing hard edges use 3M Blue 1” masking tape. Acrylic paint colors painted against the tape keeps the paint from leaking beneath the tape edge. When dry carefully remove the blue tape.

Painting techniques

Oil paint is an amazing versatile medium. It can be applied in a thick buttery fashion or thinned down to a watery consistency. This versatility opens the door to a number of different painting techniques.

My personal preference is to begin my oil paintings by first sketching out the composition using acrylic paint or with water-soluble oil paints. The popular approach to oil painting is to thin the paint with turpentine to apply your initial layers. Turpentine is quite toxic and I prefer not to work with it. Acrylic or water-soluble oil paints can be thinned down with plain old water and are more pleasant to work with in my opinion.

You can also begin your oil painting by first drawing out your composition. There are a few drawing mediums that work quite nicely with oil paints. My two favorites are vine charcoal and water-soluble pencils. I prefer vine charcoal because it doesn't smudge like other charcoals and it can be erased easier. Water-soluble pencils are wonderful because they can be applied like ordinary colored pencils and can also be dampened with a brush allowing you to spread out the color.

If you are the impatient type, you may want to try your hand at the Alla Prima oil painting technique. The Alla Prima method is when you complete the painting in one sitting rather than paint in layers and wait for the paint to dry. Although I usually prefer to work out my paintings in layers, I occasionally enjoy this exciting and spontaneous approach to oil painting.

If you are the careful, patient type of painter, you may be interested in working with glazes. Glazing has lost popularity these days, partly because of the time needed to complete such a painting and it's difficulty, but the results are something truly unique to any other type of painting technique. The composition is first painted with an opaque monochrome underpainting, usually in shades of gray. After this initial underpainting is thoroughly dry, thin layers of transparent oil glazes are applied. Colors are not mixed directly but added in separate layers to get the desired color.

If you are the adventurous type, put the brushes aside and try a set of painting or palette knives. You can achieve some very interesting results with knives that aren't possible with brushes. The oil paint can be spread on thickly and scraped off with ease. What I enjoy most about using knives is the tendency to not focus on the small details. I am forced to paint in a more relaxed fashion that creates an impressionist style painting. Get yourself a set of painting knives and try to complete an entire painting with just the knives. It's challenging at first if you are used to brushes, but it's an enjoyable exercise.

Perhaps you would like your painting to have more body and texture. You could try the impasto technique and apply your paint in thick heavy strokes, leaving evidence of all those wonderfully artistic brush strokes. Take a look at a Van Gogh painting and you will see this technique in action.

Faux painting

Our prehistoric ancestors knew all about the power of paint. Today, faux painting techniques allow anyone to give their home a magical makeover. Indoors and out, faux paint finishes can transform walls and floors, fittings and furnishings.

Faux painting can give new life to a dull room or a drab outdoor area. Marble and wood grain finishes are some of the best-known faux painting techniques, but there are many more, including brick effects and the appearance of leather. Antique and distressed finishes can be used to create the style and atmosphere of a bygone age in old houses or can refresh and embellish existing décor.

Brick and Block Effects

Raw brick is a popular look for use both indoors and out. You can add texture to a flat wall or turn dull concrete into attractive brickwork. With stencils and the right paint, it is a relatively simple task to add pattern and color to boring floors or paths. The illusion of brickwork visible behind peeling plaster is an amusing and visually effective way to create the impression of age and that antique ‘lived-in’ look.

Wood Finishes

With quality wood an expensive investment, faux painting that recreates a wood grain look is an economical alternative for doors, window frames and other household fittings. Any kind of wood look can be replicated, from patinated mahogany to rustic pine or the distressed appearance of driftwood. The dragging technique that is usually used to simulate wood grain can be especially useful if you need to match a door or window to existing wood fittings. Other items, including picture frames, fireplaces and furniture can also be transformed to match a room.

The Luxurious Look of Marble

Craftsmen centuries ago learned how to use paint to give ordinary materials the opulent appearance of marble. Faux marble can give your kitchen and bathroom an expensive and luxurious look. Paint applied with a sponge and fine brush and completed with a glossy finish help to create the illusion of fine marble. As with wood, many different effects can be reproduced. For example, a granite effect is popular for kitchen counter tops.

Other Stylish Effects

With the right materials and knowledge, a range of exotic and stylish finishes can be achieved using paint, including metallic finishes. Faux chrome details can complement contemporary homes, whereas faux bronze can add the finishing touch to a traditional room furnished with antiques.

Other faux painting techniques that simulate a warm and lived-in look include Tuscan finishes, perfect for uneven surfaces. Tuscan finishes use warm, earthy colors to create a textured and layered appearance. The Tuscan finish is ideal for kitchens and dining areas, and complements floors tiled in terracotta, but can equally add style to a living room. Vine and acanthus motifs used as a stenciled border provide a finishing touch.

Faux painting allows you to coordinate décor schemes and achieves a unified overall appearance. Antique and distressed finishes can help bring the look of a room together. New furniture and fittings can be given a glowing patina that makes them look as if they have been around for centuries. Textured finishes such as color washes can help achieve this visual effect. On furniture or doors, crackle glazes dry to look like antique varnishing.

Interior painting

In home decoration and design interior paint is considered among the most essential element in setting the mood of any room. Typically new or pre-owned homes in New York or generally everywhere, sport an interior that have been intentionally set by realtors and home owners in neutral colors. Why? Sticking to the essentials helps avoid taste conflicts, thus making the place more sellable. But for the new owner, the lot of stark white wall would soon look lifeless. To make the space more comfortable, you can inject a good dose of your personality through interior painting.

If you still are not convinced to consider an interior painting to change colors, here are several other reasons. Though the color represents modernity, it also tends look and feel impersonal as well as utilitarian. White walls can also add up to the illusion of having a more spacious room but too much of it would result to a claustrophobic feeling. And basically, the greatest drawback of an all-white interior paint is that the imperfections seem highlighted and maintaining its cleanliness can be tedious.

For many, the most difficult and stressful part would be choosing which color to integrate in your interior painting project. For one, it would be you who would be surrounded by the color that you choose so why not make it your favorite or the hue that you think you think matches your style and character and are most comfortable with? One thing to remember though, is that if you have a color in mind like blue, choose the shade which is somewhere in between which is neither too dark nor too light. But if you find it hard t make up your mind on this element of interior painting, try science as it has been known that colors have a psychological effect. You can choose which effect you want it to cause on you. Or you can also choose from among the hues that compliments with the furniture and furnishings that you have already in the room.

If you love taking on bolder or fancier approach, you can add depth and texture into the room and consider any of the following ideas on decorative interior painting:

Faux Painting

Faux means artificial. Just as the name suggests, you can create an illusion of being in one place or being surrounded by things that interest you. This interior painting idea makes your mind run wild with the possibilities like having a wall of galaxies if your are into stars and outer space.

Wall Stenciling

This decorative interior painting idea creating patterns or shapes on the walls by using a stencil or cut out template. The pattern can be used to highlight some areas of the wall or repeatedly throughout the surface.